
These are the results of yesterday's glue-up. I spent most of today belt-sanding with a couple of hours hand-sanding the feather using dry 360 and 400 grit sandpaper. I don't have anything between 400 and 1000, so this is done for now, but I'm going to round that v-notch out. I couldn't figure out how to polish the inside radii, so I used the edge of the bench with newspaper under the sandpaper. Learn as I go, I suppose.
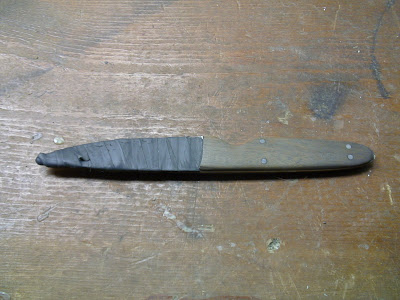
The long parts of the back and bottom are pretty scratch free and the back radius worked out pretty well. the scales are only short in one small area and I dug the excess epoxy out of the front grooves without scratching the blank. You have to be careful not to sand the damascus because the contrast goes real fast. I'm only using 1000 on the blanks, but I couldn't avoid sanding the tang. It's real shiny but no contrast. I'd take off about 5 points for working the blank. I should be able to make a 100% job on the classic small tang, because I'm sure I'll have to make whatever kind of handle before I install it. Possibly the bowie, too.
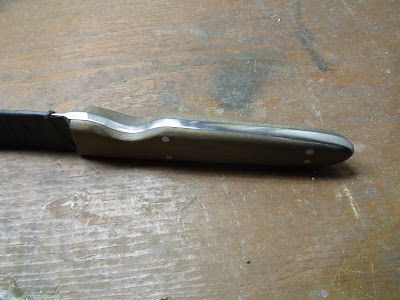
The finger guard is not satisfactory, it might even be sort of dangerous as there is no sharp transition to warn the user that he's getting near the sharp part, but I might be able to sand the radius a little better. that takes off a couple more points, say 8 and a couple more for the bit where the scale doesn't quite reach. If I can pretty it up a skosh, I'd rate it between 85-90 out of a hundred (for a really simple handle). It's the nicest I've made, so far.
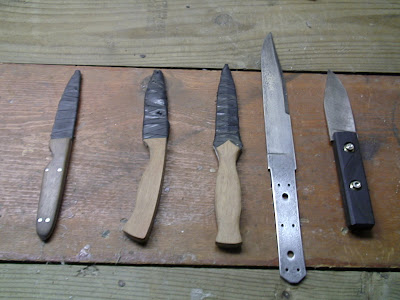
These are the five damascus blanks as they are. tomorrow, wife and weather co-operating, it's hand sanding the two glued-only knives to finish. I think they'll sand real fast without the pins. The fine sanding with pins darkens the wood. I like it, which is good because I'm not going to re-do it.

 I'm pretty pleased with the way the dagger is turning out. Although I did sand on the steel, I did much better keeping the original curves. I'm sanding them with 600 grit now, but I need to do a bit more belt-sanding on two of them.
 I should have sanded the fronts before I glued them; the end wood will look raw against the polished parts. I'm using the edge of the workbench to do the concave radii and work around the handle so all the compound curves will look right. I'm deducting about 5 points for the unsanded bolsters and about 2 points for working the damascus. I think this will finish out about 90 out of 100.
 I dug into the steel on the boot knife pretty bad. I need a smaller roller. In trying to work down to an even curve, I took out too much towards the blade and there's almost no metal where it comes to a point, plus sanding into the steel so deeply heated the blank enough so the scale is loose on one side. I might be able to skoosh just a little epoxy into the gap and re-clamp it. Frankly, I messed this one up. Minus about 20 points for gouging in so deeply. If I can salvage it, it should finish out between 75 and 85. I need to be more careful with the machine tools; it's too easy to take off too much, but I am improving.
  It looks like the epoxy only works well, but the pins are stronger and the alignment can be more precise. I'm going to get some 1/8" nickel/silver wire and I need some brass for the bowie, maybe from Dixie Gun Works.


